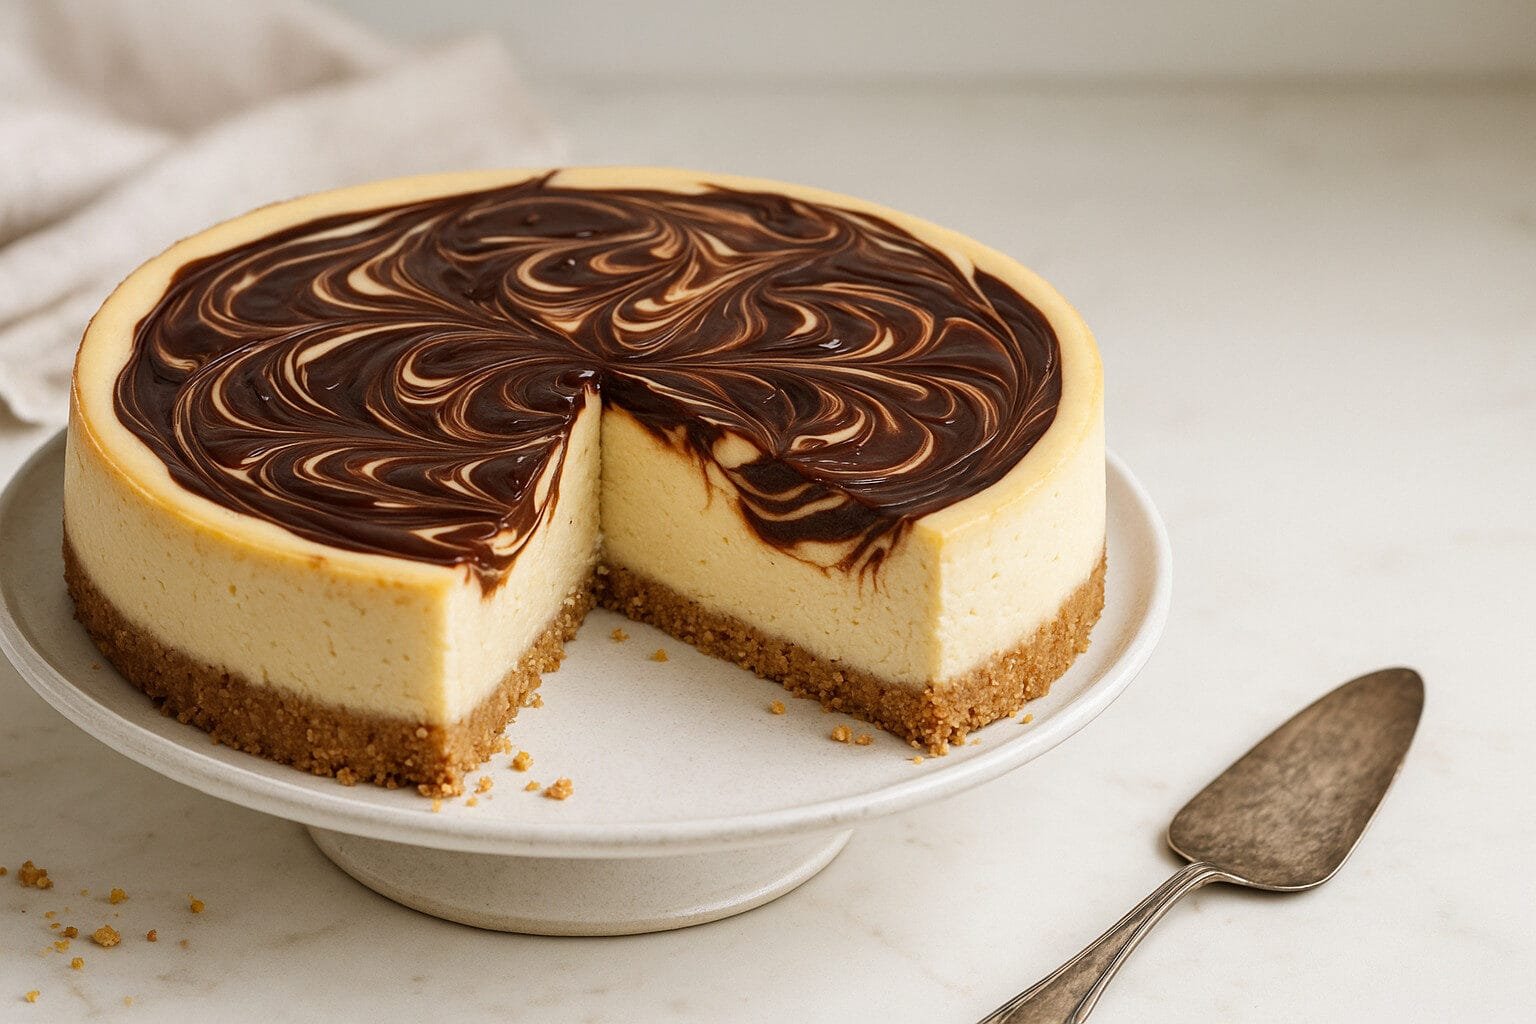
Alright, let’s get straight to it. I’ve seen so many Keto Chocolate Swirl Cheesecake recipes that promise “bakery-style” results but deliver something that’s… well, kind of sad. The chocolate swirl either sinks to the bottom or gets completely muddled into the batter. After testing this specific technique through probably a dozen iterations for my blog, I finally cracked the code. This isn’t just a vanilla cheesecake with some cocoa powder dumped in. This is a proper, marbled masterpiece with defined, beautiful swirls and that dense, luxurious texture you get from a professional bakery. The secret isn’t just in the ingredients—it’s in the temperature and the technique.
Why This Isn’t Your Average Keto Cheesecake
The Art of the Perfect Chocolate Swirl
Most recipes get this wrong because they treat the chocolate component as an afterthought. You can’t just drizzle melted chocolate on top and drag a knife through it—the densities and viscosities of the two batters have to be nearly identical, or one will just sink. I learned this the hard way. My first attempt was a chocolate-bottom cheesecake, which, while tasty, wasn’t a swirl.
The professional trick is to create a chocolate batter that’s almost a ganache-like paste. I use a combination of melted sugar-free chocolate and a little cocoa powder. The cocoa powder is key—it thickens the mixture without adding more liquid, allowing it to hold its place when swirled. You’re aiming for a thick, pipeable consistency, not a pourable one. If your chocolate mixture is too runny, it’s game over for those clean swirls.
Bakery-Style Texture on a Keto Diet
The word “bakery-style” gets thrown around a lot. To me, it means a few specific things: a plush, fine crumb with no graininess, a density that’s substantial but not heavy, and a perfect, crack-free surface. Achieving this without sugar is the real challenge. Sugar doesn’t just sweeten; it tenderizes and provides structure.
My workaround, honed over years, is a combination of full-fat dairy, room-temperature ingredients, and a very specific mixing method. You have to avoid incorporating too much air. That’s why I’m a stickler for using a paddle attachment on a stand mixer instead of a whisk, and for scraping the bowl down obsessively. Too much air leads to puffing, which leads to cracking as it cools. A water bath is non-negotiable here—it’s the insurance policy for that perfectly smooth top and creamy texture from edge to center.
Gathering Your Bakery-Style Ingredients
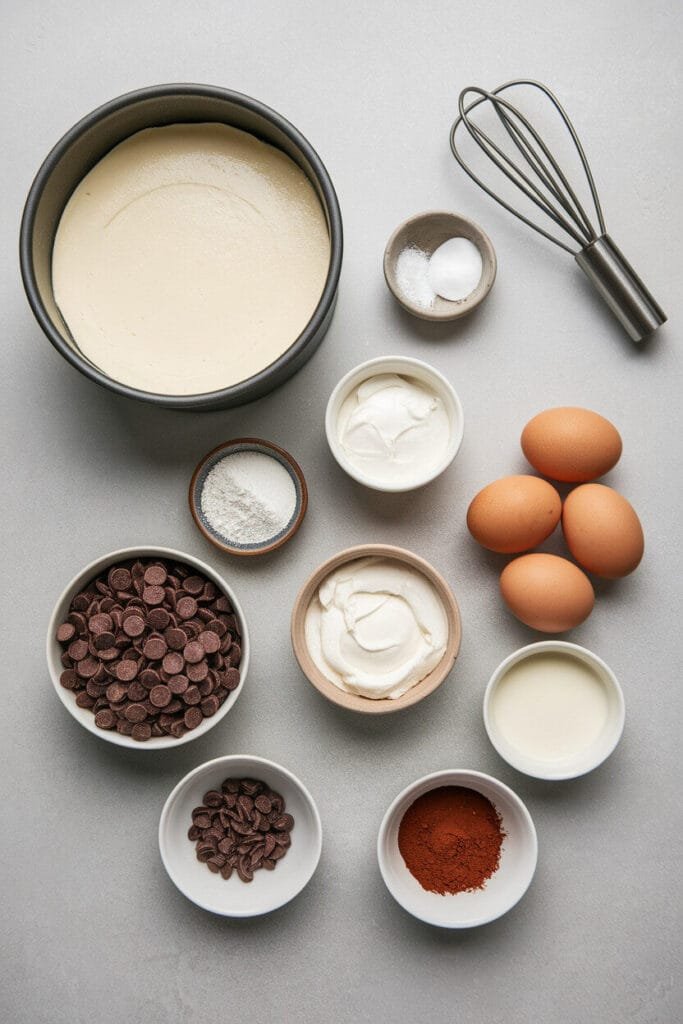
The Ultimate Cheesecake Filling Base
- Cream Cheese (24 oz, full-fat, brick-style): Use Philadelphia. The tubs have different stabilizers and a higher water content. Must be at room temperature—I can’t stress this enough. Cold cream cheese will lump and force you to overmix.
- Sour Cream (1 cup, full-fat): This adds tang and a velvety mouthfeel that heavy cream can’t quite replicate. It also thins the batter just enough without making it watery.
- Granulated Erythritol (1 cup): I use a brand like Lakanto or Swerve. Allulose can make the cheesecake too soft, in my experience, though a tablespoon or two can help with browning.
- Eggs (3 large): Room temperature. Always. They incorporate more evenly and gently.
- Vanilla Extract (1 tsp) & Almond Extract (½ tsp): The almond extract is my secret weapon. It deepens the flavor profile immensely.
Creating the Perfect Keto Chocolate Swirl
This is where the magic happens. Don’t wing it.
- Sugar-Free Dark Chocolate Chips (½ cup): I prefer Lily’s or ChocZero. They melt well and don’t have a weird aftertaste.
- Cocoa Powder (2 tbsp): Use a natural, unsweetened cocoa powder. Dutch-processed can react differently.
- Heavy Cream (3 tbsp): To help melt and smooth the chocolate.
- Confectioners Swerve (2 tbsp): This blends into the thick chocolate mixture much better than granulated.
Essential Tools for Professional Results
You don’t need a ton of gear, but the right tools make a difference.
- 9-inch Springform Pan: Absolutely mandatory.
- Stand Mixer with Paddle Attachment: A hand mixer can work, but the paddle is superior for minimizing air incorporation.
- Heavy-Duty Aluminum Foil: For the water bath seal. Don’t be shy with it—use two layers.
- Roasting Pan: Something large enough to hold the springform.
- Instant-Read Thermometer: The most reliable way to know it’s done. Aim for 150°F at the center.
[content-egg module=Amazon template=list]
Crafting Your Masterpiece: Step-by-Step Instructions
Preparing the Perfect Crust and Pan
First, don’t just grease the pan. Cut a round of parchment paper for the bottom. This is your guarantee of a clean release. For the crust, I keep it simple: 1.5 cups of almond flour, 1/3 cup of melted butter, 3 tbsp of erythritol, and a pinch of salt. Mix it, press it firmly into the bottom of the pan (use a flat-bottomed cup to really compact it), and bake at 350°F for 10 minutes. Let it cool completely before adding the filling. A hot crust will start cooking the bottom of your filling. No thanks.
Mastering the Two-Batter Method
This is the core of the recipe. Lower your oven to 325°F.
- Main Batter: In your stand mixer, beat the room-temp cream cheese until it’s completely, utterly smooth. Scrape the bowl. Add the erythritol and beat on low until combined. Scrape again. Add the sour cream and extracts, mix until just blended. With the mixer on low, add the eggs one at a time, mixing only until each yolk disappears. The moment the last egg is in, STOP. Overmixing here is the #1 cause of cracks. Set this batter aside.
- Chocolate Batter: Melt the chocolate chips and heavy cream together in a double boiler or in 20-second bursts in the microwave. Stir until smooth. Whisk in the cocoa powder and confectioners Swerve. It will be very thick—this is what you want. Let it cool for a few minutes so it doesn’t melt the main batter.
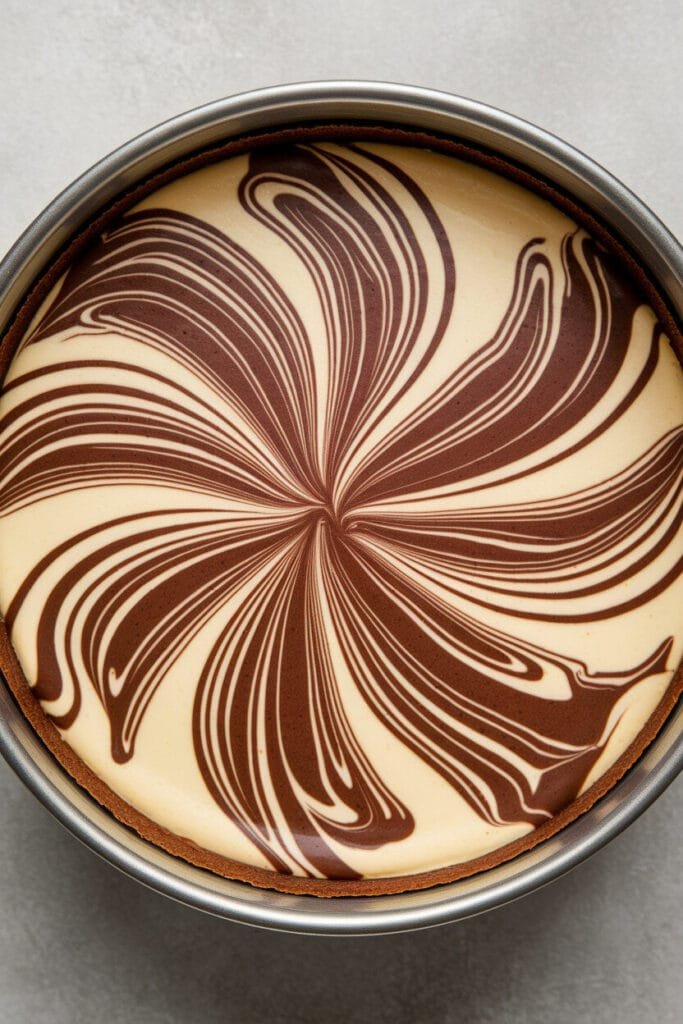
The Swirl Technique and Water Bath Bake
Now, the fun part. Pour about 2/3 of your plain cheesecake batter onto the cooled crust. Dollop about half of your thickened chocolate batter in several blobs over the surface. Pour the remaining plain batter over that, then dollop the rest of the chocolate. Now, take a skinny chopstick or the tip of a sharp knife. Drag it through the batters in a figure-eight pattern. Don’t go overboard—4-5 passes max. You want to marble, not mix.
Wrap your springform pan tightly in two layers of heavy-duty foil. Place it in the roasting pan, set it on the oven rack, and then pour hot water into the roasting pan until it comes halfway up the sides of the springform. Bake for 60-75 minutes. It’s done when the edges are set but the center still has a pronounced jiggle, like Jell-O. The thermometer should read 150°F.
The Crucial Cooling Process
Turn the oven off, crack the door, and let it cool inside for an hour. This gradual cooldown is critical for preventing the surface from cracking under thermal stress. Then, remove it from the water bath, take off the foil, and let it cool to room temp on a wire rack. Finally—and this is the hardest part—refrigerate it uncovered for at least 8 hours, preferably overnight. The filling needs this time to fully set and achieve that perfect sliceable-yet-creamy texture.
Pro Tips for Perfect Results Every Time
Troubleshooting Common Swirl Issues
- Chocolate Sinking: Your chocolate mixture was too thin. Next time, use more cocoa powder or let it cool and thicken more before swirling.
- Muddled Marble: You over-swirled. A few elegant passes are all you need. Think “accent,” not “incorporate.”
- Cracked Surface: Likely from overmixing the eggs, overbaking, or cooling too quickly. The water bath and slow cool are your best friends.
Storage and Serving Suggestions
This cheesecake keeps beautifully. Cover it tightly with plastic wrap and it will be perfect in the fridge for up to 5 days. You can also freeze entire slices on a parchment-lined baking sheet before transferring them to an airtight container for up to 3 months. Thaw in the fridge overnight.
For serving, let it stand at room temperature for 20-30 minutes before slicing. Use a sharp, thin knife dipped in hot water and wiped dry for the cleanest cuts. A dollop of keto whipped cream never hurts.
Frequently Asked Questions
Can I use a different sugar-free chocolate?
You can, but be cautious. The composition of different brands varies. Lily’s and ChocZero have proven reliable for me. If you use a bar, chop it finely for even melting.
H3: Why did my chocolate sink to the bottom?
The consistency was off. Your chocolate batter must be thick, almost like a soft frosting. If it’s pourable, it will sink. The cocoa powder is your primary tool for getting the right thickness.
H3: How do I get defined swirls instead of muddled marble?
Two things: a thick chocolate batter and a light hand. Use a skinny tool like a chopstick, and make minimal passes. It should feel like you’re barely doing anything.
H3: Can I make this dairy-free?
It’s tricky because the texture relies so heavily on cream cheese and sour cream. I haven’t found a keto-friendly dairy-free cream cheese that replicates the texture well enough for me to recommend it. The results are often grainy.
H3: How long does this cheesecake keep fresh?
Wrapped tightly in the fridge, it’s at its best for 5 days. The texture and flavor actually improve after a day.
H3: Can I freeze the cheesecake for later?
Absolutely. Freeze whole or in slices. Wrap tightly in plastic wrap and then foil to prevent freezer burn. Thaw slowly in the refrigerator.
H3: Why is a water bath necessary?
It creates a humid, gentle baking environment that cooks the cheesecake evenly without overcooking the edges. This is the single most effective technique for preventing cracks and achieving that signature creamy texture from edge to center. It’s not a suggestion—it’s a requirement for bakery-quality results.