
After developing dozens of keto desserts for clients and my own blog, I’ve found most “simple” cheesecake recipes are anything but. They demand specialty ingredients, complicated techniques, or they simply don’t set properly. This 5-ingredient keto peanut butter cheesecake is different. It’s the result of stripping the process down to its absolute fundamentals, focusing on the chemical interaction between fat, air, and a stabilizing sweetener. We’re not just mixing things in a bowl; we’re building an emulsion that sets without baking. This recipe works because it respects the science of each component. No gelatin, no obscure thickeners—just precision.
Why This Keto Cheesecake Recipe Actually Works
Most failed no-bake cheesecakes suffer from one of two fates: they’re either a soupy, unset mess or a dense, greasy brick. The failure usually happens at the molecular level. The fat in the cream cheese and peanut butter needs to be whipped with air to create a light, stable structure that can hold its shape when chilled. If the ingredients are too warm, the emulsion breaks, releasing the fat and water, and you’re left with a puddle. It’s frustrating, I know.
The Science of No-Bake Keto Desserts
Traditional no-bake cheesecakes rely heavily on sugar. Not just for sweetness, but for structure. Sugar dissolves in the water content of the dairy, forming a syrup that helps thicken and stabilize the mixture. In a keto recipe, we don’t have that luxury. So we have to create structure through other means: mechanical aeration and fat crystallization.
When you beat full-fat cream cheese, you’re trapping tiny air bubbles within its network of milk proteins and fat globules. The powdered erythritol (or allulose) acts as an abrasive, helping to incorporate more air. Then, when chilled, the fat in the cream cheese and peanut butter firms up, locking that airy structure in place. It’s a physical set, not a chemical one. This is why ingredient temperature and mixing technique aren’t just suggestions—they’re the entire foundation of the recipe.
Ingredient Quality Over Quantity: A Professional’s Take
With only five components, each one carries immense weight. There’s no room for error or low-quality substitutes. This is where I see most home cooks go wrong. They think any cream cheese will do. It won’t. You need a full-fat, brick-style cream cheese, not the spreadable kind from a tub. The tub versions contain stabilizers like gum and gelatin that interfere with the pure emulsion we’re trying to build. They often have a higher water content, which is the enemy of a clean set.
And the peanut butter? It must be the natural, runny kind, with just peanuts and salt. The hydrogenated, shelf-stable kinds are packed with sugars and hard fats that seize up and create a gritty, unpleasant texture. They don’t incorporate smoothly. I’ve tested this with at least ten different brands, and the difference is not subtle. It’s the difference between a silky filling and a grainy one.
Sourcing Your 5 Ingredients for Optimal Results
Let’s be brutally honest about what you’re buying. The success of this minimalist recipe hinges entirely on the quality and specific type of each ingredient. Don’t just grab what’s on sale.
Choosing the Right Cream Cheese: Block vs. Tub
This is the hill I will die on. You must use a block-style, full-fat cream cheese. Philadelphia brand is the consistent winner in my kitchen tests. Why? The manufacturing process for brick cream cheese creates a tighter protein and fat matrix that can hold a tremendous amount of air when beaten. The spreadable tub versions are designed to be, well, spreadable. They have a higher moisture content and added emulsifiers like whey protein concentrate or carob bean gum. These additives prevent the mixture from setting up firmly. They make it soft, which is great for a bagel, but terrible for a sliceable cheesecake. If your filling is soft, this is likely the culprit.
Peanut Butter Selection: Avoiding Hidden Sugars
You want a peanut butter where the oil separates at the top. That’s a good sign. It means it’s just ground peanuts. Stir it thoroughly before using. Look at the ingredient list: it should say “peanuts, salt.” That’s it. Avoid anything with “partially hydrogenated oils,” “palm oil,” or “sugar.” The added fats in conventional peanut butter have a different melting point than peanut oil, which can create a waxy mouthfeel and prevent proper emulsification. The sugar, obviously, throws off the carb count. I prefer a “no-stir” natural peanut butter for consistency, but any pure, natural one will work as long as it’s well-mixed.
Natural vs. Artificial Sweeteners: Texture & Aftertaste Analysis
For this recipe, a powdered sweetener is non-negotiable. Granular erythritol or monk fruit won’t dissolve fully, leaving a sandy, cooling sensation that I find really unpleasant. You need the powdered version. I use either powdered erythritol or powdered allulose.
- Powdered Erythritol: More common and less expensive. It can have a pronounced “cooling” effect on the palate, which some people dislike. It also recrystallizes when very cold, which can slightly affect the texture of the frozen cheesecake.
- Powdered Allulose: My personal preference. It behaves more like sugar, with no cooling effect and it stays softer when frozen. It’s also more hygroscopic (water-attracting), which can help keep the cheesecake a bit creamier. It’s more expensive, though.
I do not recommend stevia or monk fruit drops in this particular recipe. The concentrated liquid can easily overpower the delicate peanut butter flavor and doesn’t contribute to the bulk or structure that the powdered versions provide.
The Step-by-Step Method for Perfect No-Bake Cheesecake
Here is the complete recipe. Follow the techniques, not just the ingredients list.
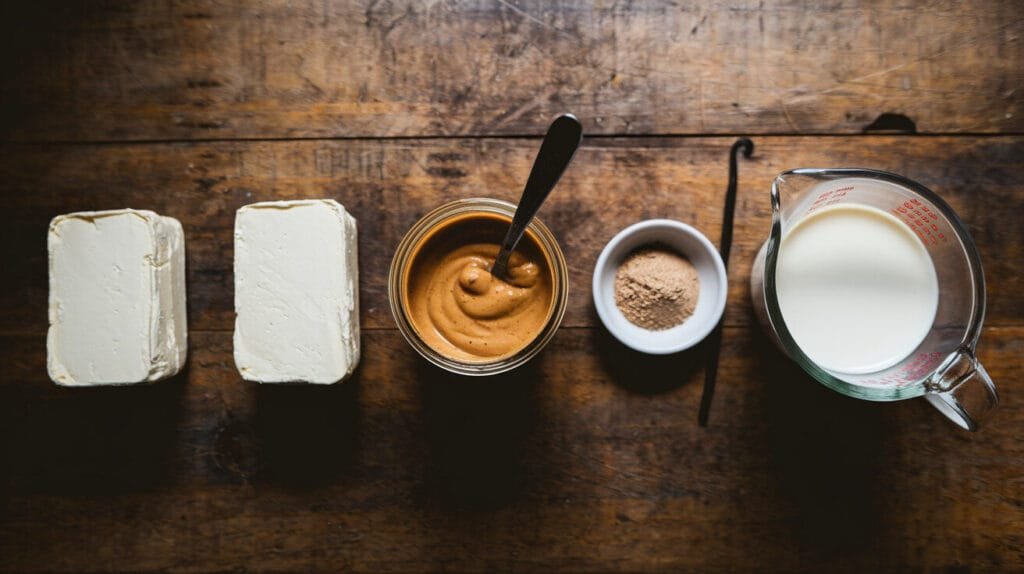
Ingredients:
- 16 ounces (two 8-oz blocks) full-fat cream cheese, softened
- 1 cup natural, smooth peanut butter (just peanuts and salt)
- 1 cup powdered erythritol or allulose
- 1 teaspoon vanilla extract
- 1 cup heavy whipping cream, cold

- A gluten-free peanut butter that has 7g protein (7% DV) per serving
- Contains no artificial preservatives and Non-GMO**
- Every jar contains that mouthwatering fresh roasted peanut taste!


- Creamy Peanut Butter: Spread on the smiles with tasty, creamy peanut buttery perfection. Add more yum and fun to just ab…
- Real Roasted Peanuts: This gluten free, certified kosher, tree nut free peanut butter is made with real roasted peanuts …
- Smooth, Naturally: Our peanut butter spreads have no preservatives, artificial flavors or colors. Try them on crackers, …

- One 40 ounce jar of Creamy Peanut Butter
- Some of your favorite Amazon Fresh products are now part of the Amazon Grocery brand! Although packaging may vary during…
- Made with USA grown peanuts
Instructions:
Mastering the Cream Cheese Base: Temperature is Everything
- The Softening: Take your brick cream cheese out of the fridge at least 2 hours before you start. It needs to be at a cool room temperature—around 65-68°F. If it’s too cold, it won’t whip properly and will be lumpy. If it’s too warm, the fat will break and it will become soupy. You should be able to press your finger into it easily, but it shouldn’t feel warm or greasy.
- The Creaming: In a large bowl, beat the softened cream cheese with an electric hand mixer or in a stand mixer with the paddle attachment. Start on low to break it up, then increase to medium-high. Beat for a full 2-3 minutes until it’s completely smooth, pale, and whipped. Scrape down the bowl thoroughly. This initial aeration is critical for structure.
- Incorporating Flavors: Add the peanut butter, powdered sweetener, and vanilla extract. Beat on medium speed for another 1-2 minutes until the mixture is completely uniform. It will be very thick. Scrape the bowl again, ensuring no un-mixed cream cheese remains at the bottom.
Achieving the Perfect Set: Why Chilling Time Matters
- The Whipped Cream Component: In a separate, clean, cold bowl, whip the heavy cream until stiff peaks form. Don’t use the same beaters without washing them, as any trace of fat from the cream cheese mixture will prevent the cream from whipping properly.
- The Fold: This is the most delicate step. Add about one-third of the whipped cream to the peanut butter mixture. Use a spatula to fold it in gently. This means cutting through the center of the bowl, sliding along the bottom, and folding the mixture over on top of itself. Rotate the bowl a quarter turn and repeat. This lightens the dense base. Now, add the remaining whipped cream and fold gently until just combined. Do not stir or beat, or you’ll deflate all the air you just incorporated.
- The Chill: Pour the mixture into a prepared crust (if using) or simply into a 9-inch pie dish or springform pan. Smooth the top. Refrigerate for a minimum of 6 hours, but overnight is truly ideal. The fat needs time to fully crystallize and set the structure. Rushing this step leads to a sliceable-but-mushy texture.
Professional Swirling Technique for Presentation
For a marbled effect, reserve about 1/2 cup of the plain filling before adding the peanut butter. After you’ve poured the peanut butter filling into the pan, dollop the reserved plain filling on top. Use a knife or a skewer to gently swirl it through the peanut butter layer. Don’t overdo it—three or four figure-eight motions are plenty. This creates a beautiful, professional-looking finish that hints at the complexity of the flavor.
Frequently Asked Questions
Can I use almond butter instead of peanut butter?
You can, but the texture and flavor will be different. Almond butter is often oilier and has a more pronounced, sometimes bitter, flavor. The result will be less firm and the taste will be distinctly of almonds, not peanuts. If you do substitute, use the same quantity but look for the driest, creamiest almond butter you can find.
Why is my cheesecake not setting properly?
Three likely culprits: 1) Your cream cheese was too warm, breaking the emulsion. 2) You used a spreadable cream cheese from a tub, which has too much water. 3) You didn’t whip the cream cheese long enough at the beginning to build structure, or you deflated the whipped cream by mixing too aggressively. The fix is always to start with cold, properly sourced ingredients and follow the mixing technique to the letter.
How long will this cheesecake keep in the refrigerator?
In an airtight container, it will keep perfectly for up to 5 days. The texture actually improves over the first 24 hours. After 5 days, it may start to weep a little moisture and the crust (if you used one) will begin to soften.
Can I freeze this keto peanut butter cheesecake?
Absolutely. It freezes exceptionally well. Wrap the whole cheesecake or individual slices tightly in plastic wrap, then in foil, and freeze for up to 2 months. Thaw overnight in the refrigerator. The texture will be slightly denser but still very creamy and delicious.
Is this recipe truly only 5 ingredients including the crust?
This is a fair question. The filling is 5 ingredients. A classic crust would add more. For a simple keto crust, you can mix 1 1/2 cups of almond flour, 1/3 cup of powdered erythritol, and 1/3 cup of melted butter, press it into the pan, and bake at 350°F for 10 minutes before cooling completely. But honestly? I often just press the filling into a dish without a crust. It’s rich enough to stand on its own.
What are the net carbs per serving?
This varies based on your specific brands, but a general estimate for the filling only (divided into 12 servings) is about 4-5g net carbs per slice. The primary carbs come from the peanut butter and the small amount naturally present in the dairy. Always calculate using your own product nutritional labels for the most accuracy.