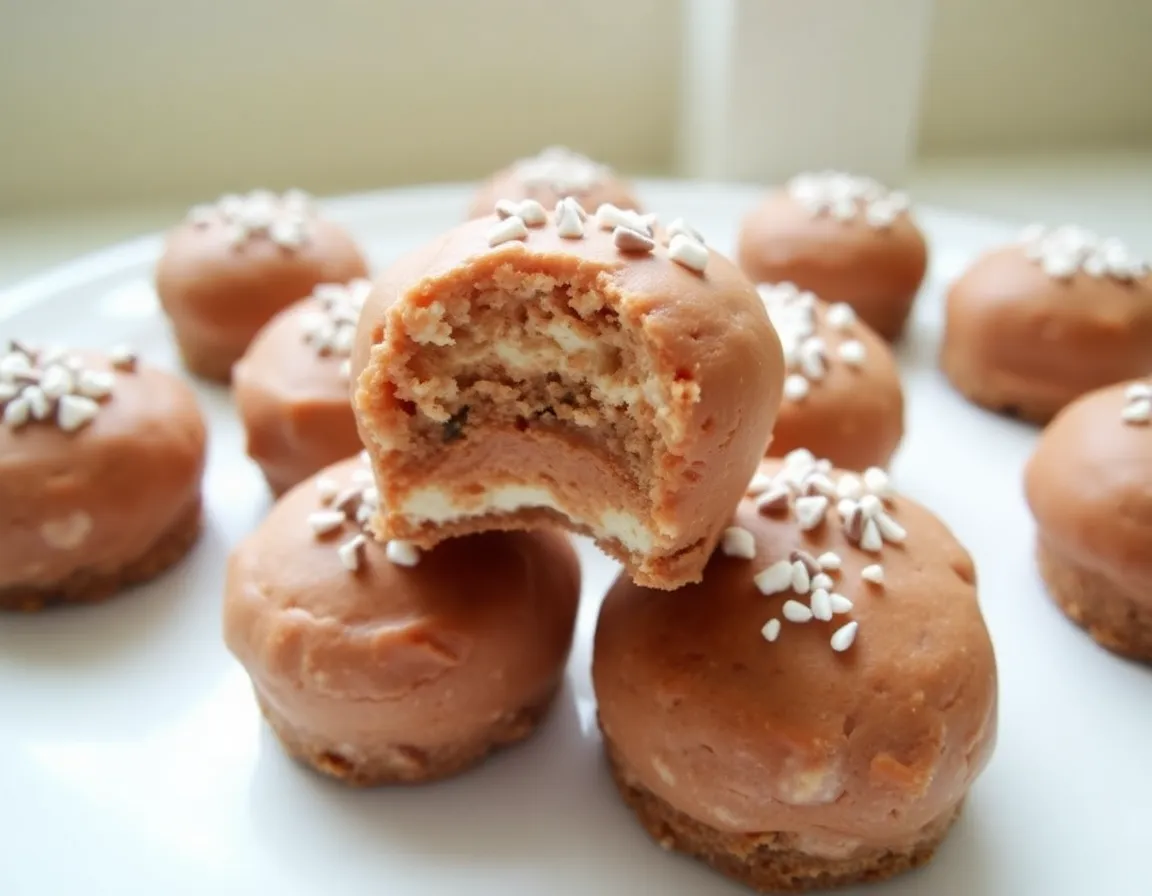
Let’s be honest—navigating dessert tables during the holidays while sticking to a low-carb lifestyle can feel like a tactical mission. I’ve been there, staring down a plate of cookies with a mixture of longing and frustration. That’s exactly why I spent years perfecting a recipe that would feel like a total treat without the sugar crash. These Low Carb Gingerbread Cheesecake Bites are my proudest creation. They’re rich, creamy, and packed with all the warm, spiced flavor you crave this time of year. Best of all, they’re no-bake and surprisingly simple to make.
Why This Recipe is a Holiday Game-Changer
I love a fancy dessert as much as the next person, but during the busy holidays, simplicity is key. This recipe is my go-to for three big reasons.
First, it’s a no-bake wonder. Your oven is probably working overtime already, so why not give it a break? Second, the flavor is deep and authentic. Through plenty of trial and error, I discovered a simple trick to mimic that classic molasses taste without the sugar. Finally, these bites are portable and make for a stunning presentation. Bringing a platter of these to a party isn’t just bringing dessert; it’s bringing a conversation starter.
The Secret to That Deep Gingerbread Flavor
You might be wondering how we get that rich, almost molasses-like taste without using any actual molasses. The answer is a combination of two things. The spice blend is crucial—don’t be shy with the ginger and cinnamon. But the real secret weapon is a very small amount of blackstrap molasses or a good sugar-free maple syrup.
Now, I can see you raising an eyebrow at the molasses. “I thought this was low-carb?” Stick with me. Using a single teaspoon of blackstrap molasses for the entire batch adds an incredible depth of flavor that pure sweeteners can’t achieve. When divided across 20-plus bites, the carb impact per serving is negligible, but the flavor payoff is enormous. It’s a trade-off I’m always willing to make. If you’d rather avoid it completely, a sugar-free maple syrup works beautifully too.
Your Simple Shopping List
Gathering the right ingredients is the first step to success. Using full-fat products is non-negotiable here—it’s what gives the cheesecake its luxurious texture.
For the Spiced Crust:
- 1 ½ cups finely ground almond flour
- ¼ cup granulated monk fruit sweetener or erythritol
- 1 teaspoon ground ginger
- ½ teaspoon ground cinnamon
- ¼ teaspoon ground nutmeg
- A tiny pinch of ground cloves (trust me, it makes a difference)
- 5 tablespoons unsalted butter, melted
- ½ teaspoon vanilla extract
For the Gingerbread Cheesecake Filling:
- 16 ounces (two full blocks) of full-fat cream cheese, softened
- ¾ cup powdered erythritol
- 1 teaspoon vanilla extract
- 1 teaspoon ground ginger
- 1 teaspoon ground cinnamon
- ¼ teaspoon ground nutmeg
- 1-2 tablespoons sugar-free maple syrup OR 1 teaspoon blackstrap molasses
- ½ cup heavy whipping cream
If you love the ease of no-bake treats, you’ll probably enjoy my simple method for No-Bake Keto Almond Butter Bars. They’re another fantastic option for a quick, satisfying sweet fix.
Let’s Make Them: A Foolproof Step-by-Step Guide
This process is straightforward, but a few key techniques make all the difference. Read through once before you start.
Crafting the Perfect Spiced Crust
- Combine Dry Ingredients: In a medium bowl, whisk together the almond flour, granulated sweetener, ginger, cinnamon, nutmeg, and cloves. Whisking ensures the spices are evenly distributed so you don’t get a mouthful of just one flavor.
- Add Wet Ingredients: Pour in the melted butter and vanilla extract. Stir with a fork until the mixture resembles wet sand and holds together when you pinch it.
- Prepare the Pan: Line an 8×8 inch baking pan with parchment paper, leaving some overhang on two sides. This is your lifeline for easily removing the entire cheesecake slab later.
- Press and Set: Transfer the crust mixture to the pan and press it down firmly and evenly. I like to use the bottom of a flat glass or measuring cup to get it really compact. Pop the pan into the freezer for 15-20 minutes to firm up.
Whipping Up the Dreamy Filling
- Cream the Base: In a large bowl, beat the softened cream cheese and powdered sweetener with an electric mixer until it’ completely smooth and free of lumps. This is the most important step for a silky texture, so take your time and scrape down the sides of the bowl.
- Incorporate Flavors: Beat in the vanilla extract, ginger, cinnamon, nutmeg, and your chosen flavor booster (maple syrup or molasses).
- Whip the Cream: In a separate, spotlessly clean bowl, whip the heavy cream until stiff peaks form. Be careful not to over-whip it, or you’ll start making butter!
- Fold Gently: Now for the magic. Add about a third of the whipped cream to the cream cheese mixture and fold it in with a spatula to lighten it up. Then, gently fold in the rest of the whipped cream until just combined. This technique is what gives the filling its light, mousse-like quality instead of a dense, heavy one.
Assembly and the Patience Game
- Layer It Up: Pull your crust from the freezer. It should be firm. Spread the gingerbread cheesecake filling evenly over the crust.
- Smooth the Top: Use an offset spatula or the back of a spoon to smooth the top into a beautiful, even layer.
- Chill Out: Cover the pan tightly with plastic wrap and refrigerate for at least 6 hours. I strongly recommend letting it chill overnight. This isn’t just about firming up; it’s about allowing the flavors to meld and become something truly special.
My Hard-Earned Pro Tips for Flawless Bites
I’ve made every mistake possible so you don’t have to. Here’s what I’ve learned.
- Softened Cream Cheese is Non-Negotiable: Leave your cream cheese on the counter for a few hours until it’s perfectly soft. If it’s even slightly cold, you’ll end up with a lumpy filling, no matter how long you mix it.
- Spice to Your Heart’s Content: This recipe is a template. If you’re a ginger fiend, add an extra half teaspoon. For a more complex warmth, a tiny pinch of black pepper can actually enhance the gingerbread flavor in a surprising way.
- The Clean Slice: When it’s finally time to cut, use a sharp knife. For picture-perfect squares, dip the knife in hot water and wipe it clean between each cut.
- Garnish for Glory: Right before serving, a light dusting of a mixture of cocoa powder and powdered erythritol looks like a professional finish. A tiny sprinkle of extra cinnamon works too.
For another holiday favorite that uses a similar spice profile, check out my Low Carb Pumpkin Cheesecake. It’s another showstopper that’s always on my Thanksgiving table.
Answering Your Gingerbread Questions
How long will these keep in the fridge?
You can store them in an airtight container for up to 5 days. Honestly, they often taste even better on the second day as the flavors have more time to get to know each other.
Can I freeze these cheesecake bites?
Absolutely! They freeze exceptionally well. Place the cut bites on a parchment-lined baking sheet and freeze until solid (about 2 hours). Then, transfer them to a freezer bag or container. They’ll keep for up to 3 months. Thaw in the refrigerator overnight before serving.
My filling turned out a bit soft. What happened?
This usually boils down to one of three things: the cream cheese wasn’t soft enough to begin with, the whipped cream was a bit under-whipped, or it simply didn’t chill long enough. Patience is the key ingredient here!
I need a nut-free crust. What can I use?
You can try using sunflower seed flour as a 1:1 substitute for the almond flour. Just be aware that it can sometimes cause baked goods to turn a slight green color over time due to a harmless chemical reaction. It’s perfectly safe to eat but can look a little surprising! For a completely different base, my Keto Coconut Flour Muffins use a nut-free flour that could inspire a crust alternative.
Your Final Thoughts Before You Bake
So, there you have it. These Low Carb Gingerbread Cheesecake Bites are more than just a recipe; they’re your ticket to enjoying the holidays without compromise. They’re proof that with a few smart ingredient swaps and a little patience, you can create something truly decadent that aligns with your lifestyle.
I promise, the moment you taste that spiced, creamy filling against the nutty crust, you’ll feel like you’ve unlocked a new level of holiday baking. So, go on—clear a space in your fridge and get ready to make a dessert that might just upstage the main course.